Understanding the Connection Between SI Joint Pain and Tight Hip Flexors
The sacroiliac joint stabilizes force transfer between your legs and spine. When hip flexors—especially the psoas and iliacus—are tight or overactive, they tip the pelvis forward, increase lumbar extension, and add shear and compression at the SI joint. Over time, this altered alignment and load can irritate joint ligaments and provoke guarding in surrounding muscles, undermining stability.
Anatomy explains the link. The psoas major spans from the lumbar spine (T12–L5) to the lesser trochanter; the iliacus originates on the iliac fossa and joins the psoas onto the same insertion. Shortening pulls the femur and pelvis into anterior tilt and can rotate one hemipelvis more than the other, stressing the joint. Active trigger points in the iliacus often refer pain to the groin and front of the hip, while a reactive psoas can produce deep ache near the lower back—patterns easily mistaken for SI-only pain.
Clues that hip flexors are driving your symptoms:
- Increased pain with prolonged sitting, then first steps after standing
- Anterior pelvic tilt, tightness at the front of the hip, or difficulty lying flat
- Pain that eases when you engage glutes or stretch the front of the hip
- Asymmetrical stride, with one hip feeling “pulled” forward
For many, combining hip flexor mobility techniques with targeted myofascial work offers meaningful sacroiliac joint dysfunction relief. Gentle psoas muscle release and iliacus trigger point therapy can reduce tone, restore pelvic neutrality, and offload the SI joint—often improving stability drills and gait mechanics that follow. For example, releasing the dominant-side iliacus before practicing glute bridges frequently allows more even pelvic lift with less SI irritation.
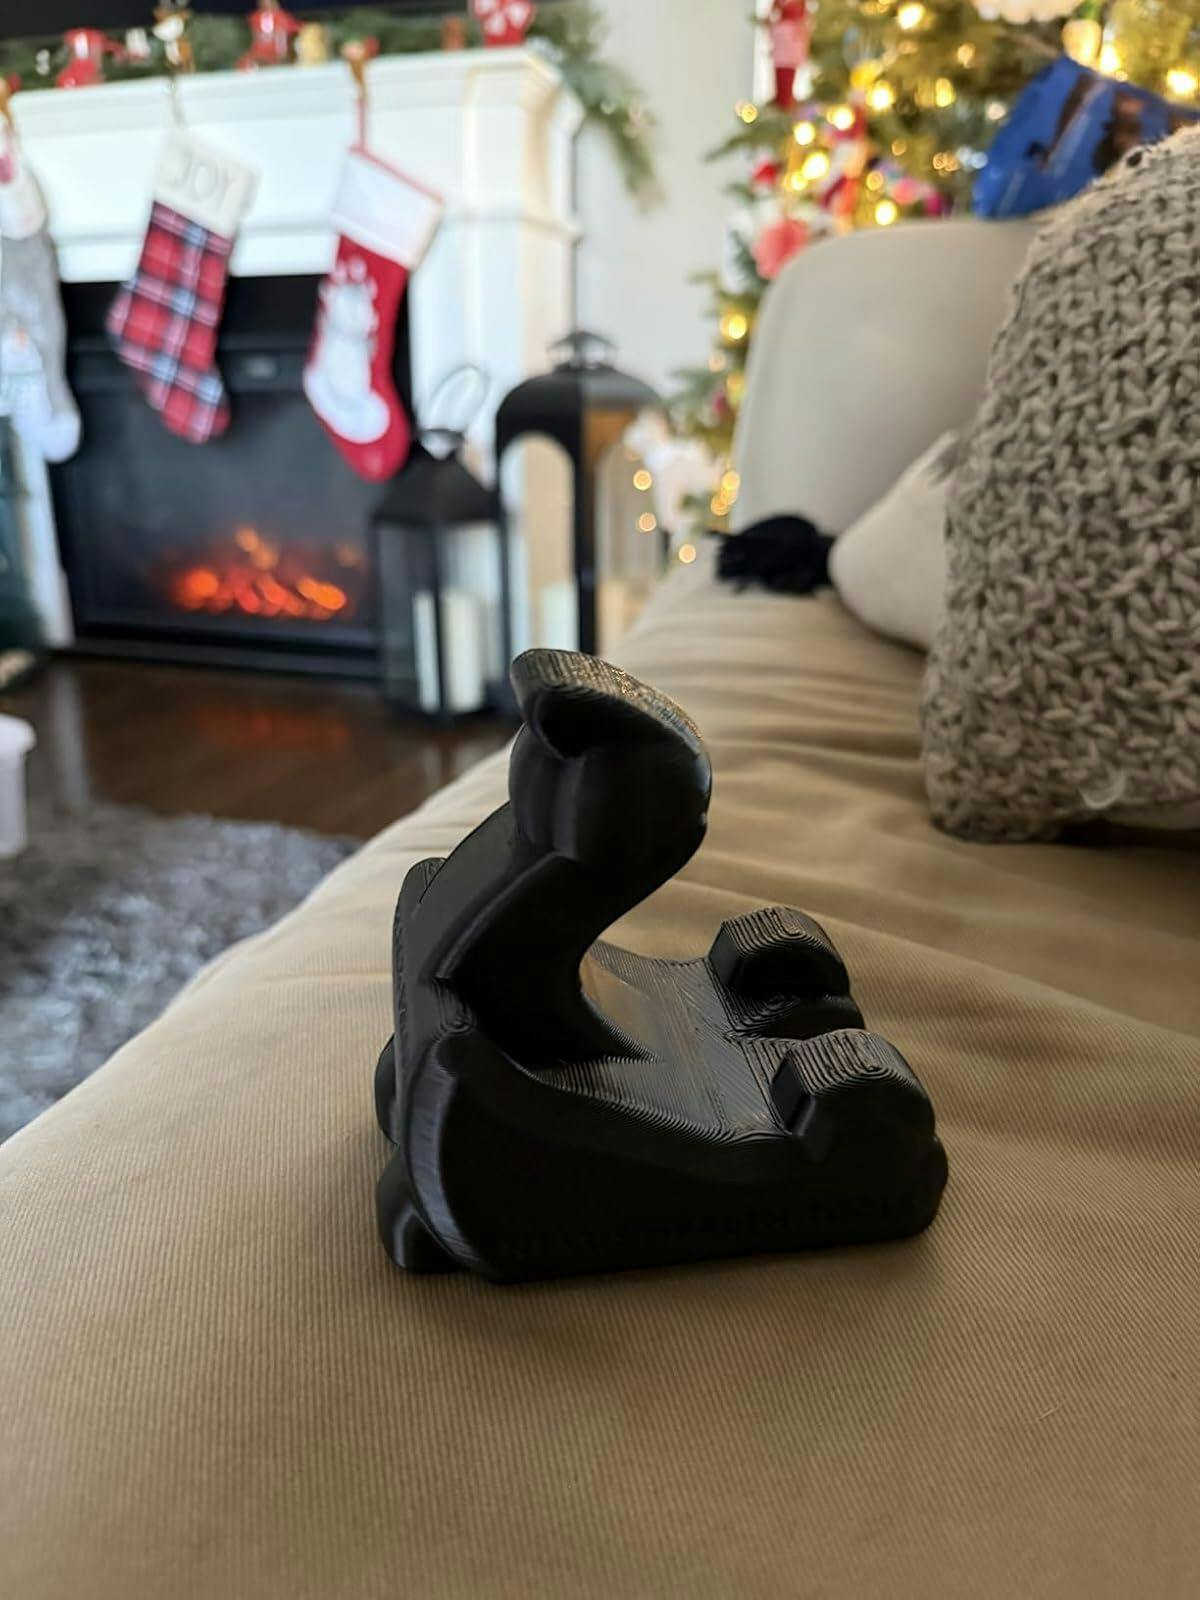
A focused tool can make deep, precise work easier and safer than improvising with balls or sticks. The Core Nexus by Nexus Health Tools features a broad tip for deep psoas access and a narrow curved tip for the iliacus; its smooth rotation helps reach fibers along the pelvic rim without excessive pressure. Used alongside mobility and strengthening, it can support chronic SI joint pain relief and contribute to lower back pain relief by improving hip mechanics at the source. As always, consult a clinician if symptoms are severe, radiating, or neurological.
The Anatomical Role of the Psoas and Iliacus in Sacroiliac Stability
The psoas major and iliacus—together forming the iliopsoas—are primary hip flexors that also influence pelvic positioning and lumbar stability. The psoas originates along the sides of the lumbar vertebrae and the iliacus from the iliac fossa; both converge on the lesser trochanter of the femur. Through their tone and timing, they can tip the pelvis forward, increase lumbar lordosis, and alter the mechanics of the sacroiliac joints. When one side is shortened or guarded, it can draw the ilium into anterior rotation on that side, creating asymmetrical load across the SI joint.
This asymmetry is a common driver of irritation in the area. Overactive hip flexors limit hip extension, forcing compensations during walking and standing that increase shear at the sacrum. Trigger points in the iliacus can refer deep ache to the groin or front of the hip, while psoas trigger points often refer to the lower back. Addressing these patterns is central to sacroiliac joint dysfunction relief and sustained lower back pain relief.
Clues the hip flexors are contributing to SI symptoms include:
- Pain or tightness in the groin with sit-to-stand
- Discomfort rolling in bed or extending the hip behind you
- Tenderness along the inside rim of the iliac crest
- A visible or felt anterior pelvic tilt
Targeted psoas muscle release and iliacus trigger point therapy reduce resting tension, restore hip extension, and improve “force closure” by allowing the glutes, deep abdominals, and pelvic floor to stabilize the pelvis more effectively. These changes support chronic SI joint pain relief and better hip alignment.
For precise self-care, Shopify Nexus Health Tools’ Core Nexus is designed to reach these deep structures. Its broad, purpose-built rotating tip helps safely access and desensitize the psoas, while the narrow curved tip reaches the iliacus along the inner iliac fossa. Smooth rotation enables gradual depth with less guarding—ideal for hip flexor mobility techniques at home. For example, desk-bound users with anterior pelvic tilt often report improved standing comfort and reduced SI irritation after consistent iliacus-focused sessions combined with glute activation.
Identifying Symptoms of Sacroiliac Joint Dysfunction and Anterior Pelvic Tilt
Sacroiliac joint issues often present with recognizable patterns that point you toward chronic SI joint pain relief strategies. Many people with SI dysfunction also show signs of anterior pelvic tilt, which increases stress at the joint.
Common signs your SI joint is involved:
- One-sided, deep ache near the “back dimples” (PSIS) with possible referral to the buttock, groin, or outer thigh
- Pain that flares during transitions: rolling in bed, getting out of a car, sit-to-stand, or climbing stairs
- Discomfort when standing on one leg, walking on uneven ground, or after long periods of standing
- Local tenderness to pressure just inside the posterior hip bone (sacral sulcus)
- Morning stiffness that eases with light movement; aggravated by asymmetrical lifting or carrying
Practical self-checks you can try:
- Gentle compression of the pelvis (hands on the sides of the hips) reproduces pain; relief when you hug knees to chest
- The FABER/figure-4 position brings on posterior pelvic pain
- A feeling of “instability” or catching around the back of the hip during single-leg stance
Clues you may have anterior pelvic tilt contributing to symptoms:
- Forward-tilted pelvis with increased lower-back arch and a protruding abdomen
- Tightness at the front of the hips, restricted hip extension, and hamstring tightness
- Hip or low-back discomfort after prolonged sitting; relief with hip flexor stretching
- Glute weakness and difficulty engaging the deep core during standing or walking
Why this matters: tight, overactive hip flexors—especially the psoas and iliacus—can pull the pelvis forward, load the SI joint, and perpetuate lower back pain. Targeted psoas muscle release and iliacus trigger point therapy often reduce tilt and improve sacroiliac joint dysfunction relief.
For precise self-release, the Core Nexus from Shopify Nexus Health Tools provides a broad tip for deep psoas work and a narrow curved tip to access the iliacus, complementing hip flexor mobility techniques and helping you progress toward lower back pain relief.
Preparing for Self-Myofascial Release with Professional-Grade Recovery Tools
Effective preparation improves safety and results when your goal is chronic SI joint pain relief. The psoas and iliacus influence pelvic position and load transfer through the sacroiliac joint; excessive tension can feed anterior pelvic tilt and limit hip extension. A brief setup routine primes tissue, calms the nervous system, and clarifies what to target.
Start by creating a quiet space with a firm surface. Take baseline notes you can retest: stand and note pelvic tilt in a mirror, perform a gentle prone hip extension, and rate discomfort during a 10-second single-leg stance. These snapshots help you gauge sacroiliac joint dysfunction relief after the session.
Quick pre-session checklist:
- Light warm-up: 3–5 minutes of walking or heat to the lower abdomen/hip flexors
- Hydration and loose clothing
- Contraindication screen: recent surgery, acute trauma, unexplained numbness, or severe pain—consult a clinician first
- Pain guideline: pressure should feel productive but tolerable (about 4–6/10)
- Breathing plan: slow nasal inhale, long mouth exhale
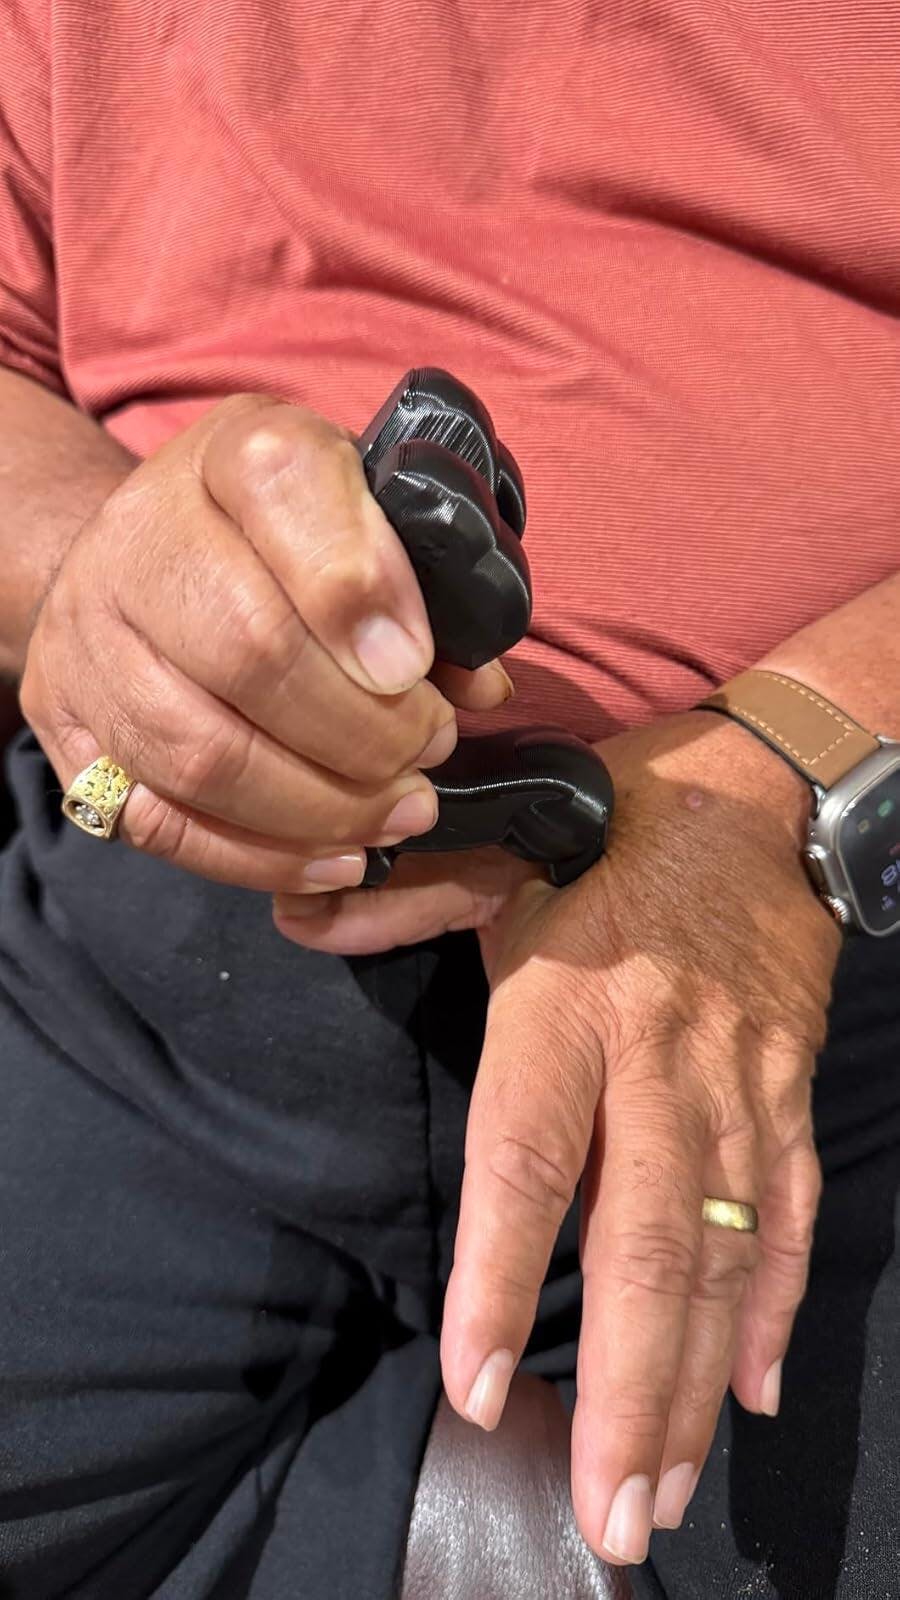
Select a professional-grade tool that can reach deep tissue without slipping. The Core Nexus by Nexus Health Tools is designed for precise psoas muscle release and iliacus trigger point therapy. Use the broad rotating tip to address deep psoas tension near the front of the spine; choose the narrow curved tip to access the iliacus along the inner pelvis. Smooth rotation allows gradual penetration without aggressive force, which is crucial around sensitive neurovascular structures.
Prime your system with two minutes of diaphragmatic breathing in a hook-lying position. On each exhale, lightly draw the ribs down; this reduces reflexive hip flexor guarding. Add gentle hip flexor mobility techniques, like a low lunge with posterior pelvic tilt, to lengthen tissue before targeted pressure.
Sample prep flow:
- 3 minutes heat + breathing
- 1 minute gentle lunge holds per side
- 30 seconds glute bridges to activate posterior chain
- Retest your single-leg stance and hip extension
This approach sets you up for focused work and more reliable lower back pain relief when you move into the main release sequence.
Step-by-Step Guide: Using the Broad Rotating Tip for Deep Psoas Release
Deep psoas work can reduce hip flexor overactivity that tugs the pelvis forward and stresses the SI joint. When the psoas softens, hip alignment improves, often translating into chronic SI joint pain relief and lower back pain relief. The Core Nexus from Nexus Health Tools is built for this task—the broad rotating tip lets you reach the deep psoas with controlled pressure and smooth rotation.
Preparation
- Timing: Work 1–2 hours after a meal.
- Warm-up: 2–3 minutes of relaxed walking and diaphragmatic breathing.
- Check-in: Note a baseline—single-leg stance or a gentle hip hinge—to retest sacroiliac joint dysfunction relief after.
Step-by-step with the broad rotating tip 1) Find the target: Locate your ASIS (front hip bone) and the navel. The psoas lies roughly one finger-width inside the ASIS toward the navel. Avoid areas with a strong pulse (femoral artery). 2) Position the device: Place the broad tip at this point angled 30–45° toward the spine. Lie prone over the device, stacking pillows under your chest if needed. 3) Slack the tissue: Bend the knee on the working side to 90° to reduce psoas tension and improve access. 4) Breathe and sink: Take 4–5 slow belly breaths, letting the abdomen melt over the tip. Keep pressure at 4–6/10. 5) Rotate to release: Use the Core Nexus’s smooth rotation—small, slow oscillations while you breathe—to encourage psoas muscle release. Spend 60–90 seconds on the first spot. 6) Scan 2–3 points: Move slightly up or down between the navel and the inner hip crest. Repeat 60–90 seconds per point. 7) Add motion: Gentle hip internal/external rotation or tiny pelvic tilts amplify the release without forcing it. 8) Retest: Stand, repeat your baseline test, and note changes in comfort and symmetry for sacroiliac joint dysfunction relief.
Aftercare and frequency
- Follow with hip flexor mobility techniques (short lunge stretch) and light glute bridges.
- Work each side 3–5 days per week, 3–5 minutes per side.
Tip: Pair this with the narrow curved tip for iliacus trigger point therapy on days you feel groin-tightness. Stop if you feel sharp, radiating pain, numbness, or dizziness; avoid during pregnancy, hernia, or recent abdominal surgery.
Precise Targeting: Accessing the Iliacus Muscle with the Narrow Curved Tip
The iliacus often hides the driver of anterior pelvic tilt and sacroiliac joint irritation. When it’s short, it tethers the ilium forward, limiting hip extension and loading the SI joint. The Core Nexus from Nexus Health Tools includes a narrow curved tip designed to reach the iliac fossa safely, making iliacus trigger point therapy more precise and effective for chronic SI joint pain relief.
How to position and find the target:
- Lie on your back with a small pillow under the knee of the side you’re treating. Let the hip bend and slightly externally rotate to slacken the iliopsoas.
- Locate your ASIS (the bony front “point” of the pelvis). Slide just inside the pelvic rim, staying above the inguinal crease and lateral to the lower abdomen.
- You’re aiming for the iliac fossa—along the inner surface of the pelvis, not over the femoral pulse. If you feel a pulse or tingling, move superior and lateral.
Applying the narrow curved tip:
- Orient the curved tip so it “hugs” the inside of the pelvic rim, just medial to the ASIS.
- Angle in toward the iliac fossa with gentle pressure. Breathe slowly; on each exhale, allow a few millimeters of deeper sink.
- Use micro-rotations or 1–2 cm sweeps along the inner crest. When you find a tender spot, hold 30–45 seconds until the tissue softens.
- Spend 2–3 minutes per side. Follow with light hip flexor mobility techniques (e.g., half-kneeling hip flexor stretch) and glute activation to reinforce alignment.
Safety notes:
- Stay superior to the inguinal crease; avoid areas with a pulse or numbness.
- Skip if you have recent abdominal surgery, hernia, pregnancy, or acute trauma without clinician guidance.
Why this matters:
- Releasing the iliacus reduces anterior shear on the SI joint, supporting sacroiliac joint dysfunction relief and lower back pain relief.
- Pair with psoas muscle release using the broad tip for comprehensive hip flexor care and better postural control.
Many desk workers notice that after a single session of targeted iliacus work, hip extension improves and SI joint ache eases later in the day—an accessible win with an all-in-one tool designed for precision.
Best Practices for Depth and Pressure Control During Hip Muscle Release
Start with position and breath control. Lie on your back with knees bent (hook-lying) to slacken the hip flexors. Take 3–4 diaphragmatic breaths to reduce guarding. This primes the area for psoas muscle release and helps you gauge safe pressure for chronic SI joint pain relief.
Use anatomical “safe windows.” For psoas, place the broad tip just inside the front hip bone (ASIS) and slightly toward the navel—well away from any noticeable pulse. For iliacus trigger point therapy, switch to the narrow curved tip along the inner rim of the pelvis (iliac crest), staying on soft tissue and off bone.
Control depth with rotation, not force. With the Core Nexus from Nexus Health Tools, let body weight provide gentle contact, then slowly rotate the device to “corkscrew” in on an exhale. Avoid jamming vertically. If you feel sharp, electric, or pulsing sensations, back off immediately and reposition.
Use a clear pressure and time framework:
- Discomfort should stay at 3–5/10 (never more than a brief 6/10 on entry).
- Psoas: 60–90 seconds per spot, 1–3 rotations as tissue softens; 2–3 spots per side.
- Iliacus: 30–60 seconds per spot with micro-rotations; trace 2–3 points along the inner crest.
- Repeat left and right to maintain pelvic symmetry for sacroiliac joint dysfunction relief.
Make small adjustments first. A 5–10 mm shift or a slight angle change often unlocks the restriction you’re chasing. If the abdomen is sensitive, place a thin towel under the tip to diffuse pressure while you adapt.
Pair depth work with gentle hip flexor mobility techniques. After releases, perform 1–2 sets of a low lunge with posterior pelvic tilt and 6–8 slow diaphragmatic breaths, then follow with light glute activation (e.g., 8–12 bridges). This sequence helps “set” hip alignment and contributes to lower back pain relief.
Practical cautions: Avoid working over recent surgery sites, hernias, or during pregnancy; skip immediately after meals. If symptoms radiate down the leg or numbness persists, stop and consult a clinician.
Long-Term Postural Benefits of Consistent Psoas and Iliacus Maintenance
Consistently reducing tone in the psoas and iliacus restores a more neutral pelvis, which decreases shear across the sacroiliac joints and helps the lumbar spine stack over the hips. Over time, this improves gait mechanics, hip extension, and trunk stability—key contributors to chronic SI joint pain relief and lasting lower back pain relief.
What to expect as alignment improves:
- Pelvis: less anterior pelvic tilt, more even ASIS height side-to-side
- Hip: smoother hip extension in walking and split-stance tasks; reduced pinch at the front of the hip
- Lumbar spine: diminished compensatory arching during standing and overhead reach
- SI joint: fewer “catch” sensations on sit-to-stand, improved tolerance to longer walks or standing
A simple maintenance plan pairs targeted work with light mobility and strength:
- Psoas muscle release: 1–2 minutes per side, 2–3 days/week. With Nexus Health Tools’ Core Nexus, use the broad rotating tip just inside the ASIS; breathe slow and low (4–6 count exhales) and allow the abdomen to soften as the tip gently rotates for depth without bracing.
- Iliacus trigger point therapy: 60–90 seconds on tender points along the inner iliac crest using the narrow curved tip. Keep pressure tolerable and non-sharp; let the rotation “melt” the spot rather than forcing it.
- Hip flexor mobility techniques: follow with a low lunge (rear glute engaged) and a prone quad stretch, 30–45 seconds each.
- Stability: finish with glute bridge holds, side-lying clamshells, and dead bug breathing to reinforce neutral pelvis.
The Core Nexus’ compact, dual-tip design makes it easy to address both tissues with precision and smooth rotation, which can help counter habitual anterior tilt patterns between sessions. Applied consistently, this approach supports sacroiliac joint dysfunction relief by improving load transfer through the pelvis, reducing flare-up frequency, and promoting durable hip alignment. If pain radiates or sharpens during pressure, reduce intensity and consult a clinician.
Complementary Stretches to Support SI Joint Health and Pelvic Alignment
After releasing tight hip flexors, anchor the gains with targeted mobility. The sequence below supports pelvic neutrality and can enhance chronic SI joint pain relief while reducing compensations that feed lower back tension.
- Kneeling hip flexor stretch (iliacus bias): Kneel with the back knee down and front foot forward. Posteriorly tilt the pelvis (tuck tail), lightly squeeze the back glute, reach the back-side arm overhead, and side-bend away from the back leg. Hold 30–45 seconds, 2–3 rounds each side. This pairs well after iliacus trigger point therapy.
- Psoas opener with strap: Lying near the edge of a bed, let the leg closest to the edge hang while the other knee is hugged to your chest. Keep the ribcage down and pelvis level. Gentle hangs for 45–60 seconds help reinforce psoas muscle release without lumbar extension.
- Figure-4 piriformis stretch: On your back, cross one ankle over the opposite knee. Draw the legs toward your chest while keeping the sacrum heavy on the floor. Hold 30–45 seconds, 2–3 rounds. This eases posterior hip tension that can tug on the sacroiliac region.
- 90/90 hip switches (controlled): Sit in 90/90, tall spine, and slowly rotate from side to side, staying within a pain-free range. Perform 6–8 slow reps each direction to balance internal/external rotation and improve hip capsule mobility.
- Adductor rock-backs: From quadruped, extend one leg out to the side with the foot flat. Keep a neutral spine and rock hips back until a gentle stretch is felt in the inner thigh. 8–10 reps, 2 sets per side. This helps the pelvis hinge without shearing the SI joint.
- Supine hamstring floss: With a strap around the foot, extend the knee toward the ceiling, ankle gently pumping. 8–10 slow reps, keeping the pelvis neutral. Reduces posterior chain pull that can aggravate the SI area.
For sacroiliac joint dysfunction relief, pair these hip flexor mobility techniques with precise soft-tissue work. Many users find that using the Core Nexus from Nexus Health Tools first—targeting deep psoas and then iliacus—primes the area so stretches “stick,” contributing to sustained lower back pain relief and improved alignment.
Conclusion: A Proactive Approach to Managing Chronic Hip and Lower Back Pain
Lasting change comes from consistent, targeted work. For many, chronic SI joint pain relief hinges on calming overactive hip flexors, restoring balance around the pelvis, and reinforcing better movement patterns. Pairing precise psoas muscle release and iliacus trigger point therapy with strength and mobility can reduce flare-ups and support lower back pain relief.
Try this simple weekly framework:
- Daily release (5–8 minutes): Use the Core Nexus from Nexus Health Tools. Start with the broad, purpose-built rotating tip to contact the psoas just inside the ASIS; rotate smoothly to sink through abdominal layers without bracing. Finish with the narrow, curved tip to access the iliacus along the inner iliac fossa on tender, ropey areas.
- Mobility (5 minutes): Add hip flexor mobility techniques after release—half-kneeling hip flexor stretch with posterior pelvic tilt, 90/90 transitions, and gentle pelvic clocks. Breathe diaphragmatically to downshift tension.
- Strength (10 minutes, 3x/week): Prioritize glute bridges, side-lying hip abduction, staggered RDLs, and anti-rotation presses. Strong glutes and lateral hips stabilize the sacrum for sacroiliac joint dysfunction relief.
- Micro-resets: After long sitting or driving, do a 2-minute psoas check-in (broad tip), a 60-second iliacus sweep (narrow tip), then 10–15 glute bridges. This helps deter anterior pelvic tilt during the day.
- Gait and posture cues: Shorten stride, keep ribs stacked over pelvis, and push the ground behind you rather than pulling with hip flexors.
- Track progress: Note standing tolerance, step symmetry, and morning stiffness on a 0–10 scale. Adjust frequency to keep soreness mild and productive.
The Core Nexus’s compact, all-in-one design makes it easy to stay consistent at home, work, or travel—key for sustaining alignment gains. If symptoms persist or radiate, coordinate with a physical therapist while continuing gentle home care. With deliberate release, smart loading, and regular reassessment, you can build a reliable, proactive system for hip alignment and sacroiliac joint dysfunction relief.